
From Zero to an Interactive Social Robot using ROS4HRI and LLMs
‼️ If you intend to ‘code along’ during the HRI’25 conference
First, you must have a working Docker environment on your machine. As we need to access your webcam and open graphical applications from Docker, we can only provide support for a Linux host.
To avoid bandwidth issues during the conference, we recommend that you download the Docker image and LLM models in advance:
- Download the tutorial Docker image:
docker pull palrobotics/public-tutorials-alum-devel:hri25
- Install ollama and download eg the
llama3.2:1bmodel:ollama run llama3.2:1bSee you soon!
Welcome!
This tutorial will guide you through the installation and use of the ROS4HRI framework, a set of ROS nodes and tools to build interactive social robots.
We will use a set of pre-configured Docker containers to simplify the setup process.
We will also explore how a simple yet complete social robot architecture can be assembled using ROS 2, PAL Robotics’ toolset to quickly generate robot application templates, and a LLM backend.
PART 0: Preparing your environment
Pre-requisites
To follow ‘hands-on’ the tutorial, you will need to be able to run a Docker
container on your machine, with access to a X server (to display graphical
applications like rviz and rqt). We will also use the webcam of your
computer.
Any recent Linux distribution should work, as well as MacOS (with XQuartz installed).
The tutorial alo assumes that you have a basic understanding of ROS 2 concepts (topics, nodes, launch files, etc). If you are not familiar with ROS 2, you can check the official ROS 2 tutorials.
Get the public PAL tutorials Docker image
Fetch the PAL tutorials public Docker image:
docker pull palrobotics/public-tutorials-alum-devel:hri25
Then, run the container, with access to your webcam and your X server.
xhost +
mkdir ros4hri-exchange
docker run -it --name ros4hri \
               --device /dev/video0:/dev/video0 \
               -e DISPLAY=$DISPLAY \
               -v /tmp/.X11-unix:/tmp/.X11-unix \
               -v `pwd`/ros4hri-exchange:/home/user/exchange \
               --net=host \
               palrobotics/public-tutorials-alum-devel:hri25 bash
💡 The
--deviceoption is used to pass the webcam to the container, and the-e: DISPLAYand-v /tmp/.X11-unix:/tmp/.X11-unixoptions are used to display graphical applications on your screen.
PART 1: Warming-up with face detection
Start the webcam node
First, let’s start a webcam node to publish images from the webcam to ROS.
In the terminal, type:
ros2 run gscam gscam_node --ros-args -p gscam_config:='v4l2src device=/dev/video0 ! video/x-raw,framerate=30/1 ! videoconvert' -p use_sensor_data_qos:=True -p camera_name:=camera -p frame_id:=camera -p camera_info_url:=package://interaction_sim/config/camera_info.yaml
💡 the
gscamnode is a ROS 2 node that captures images from a webcam and publishes them on a ROS topic. Thegscam_configparameter is used to specify the webcam device to use (/dev/video0), and thecamera_info_urlparameter is used to specify the camera calibration file. We use a default calibration file that works reasonably well with most webcams.
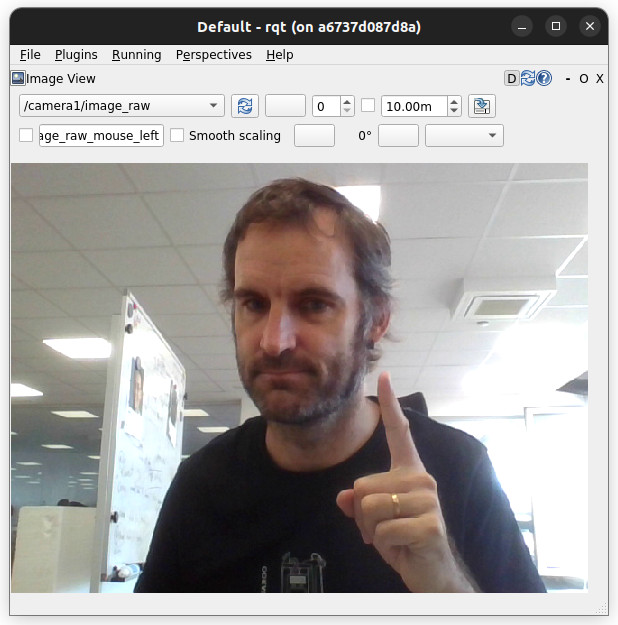
You can open rqt to check that the images are indeed published:
💡 if you want to open another Docker terminal, run
docker exec -it -u user ros4hri bash
rqt
Then, in the Plugins menu, select Visualization > Image View, and choose the topic
/camera/image_raw:
Face detection
hri_face_detect is an
open-source ROS 1/ROS 2 node, compatible with ROS4HRI, that detects faces in images.
It is already installed in the Docker container.
By default, hri_face_detect expect images on /image topic: before starting the node, we need to configure topic remapping:
mkdir -p $HOME/.pal/config
nano $HOME/.pal/config/ros4hri-tutorials.yml
Then, paste the following content:
/hri_face_detect:
   remappings:
      image: /camera/image_raw
      camera_info: /camera/camera_info
Press Ctrl+O to save, then Ctrl+X to exit.
Then, you can launch the node:
ros2 launch hri_face_detect face_detect.launch.py
You should see on your console which configuration files are used:
$ ros2 launch hri_face_detect face_detect.launch.py
[INFO] [launch]: All log files can be found below /home/user/.ros/log/2024-10-16-12-39-10-518981-536d911a0c9c-203
[INFO] [launch]: Default logging verbosity is set to INFO
[INFO] [launch.user]: Loaded configuration for <hri_face_detect>:
- System configuration (from lower to higher precedence):
	- /opt/pal/alum/share/hri_face_detect/config/00-defaults.yml
- User overrides (from lower to higher precedence):
	- /home/user/.pal/config/ros4hri-tutorials.yml
[INFO] [launch.user]: Parameters:
- processing_rate: 30
- confidence_threshold: 0.75
- image_scale: 0.5
- face_mesh: True
- filtering_frame: camera_color_optical_frame
- deterministic_ids: False
- debug: False
[INFO] [launch.user]: Remappings:
- image -> /camera/image_raw
- camera_info -> /camera/camera_info
[INFO] [face_detect-1]: process started with pid [214]
...
💡 this way of managing launch parameters and remapping is not part of base ROS 2: it is an extension (available in ROS humble) provided by PAL Robotics to simplify the management of ROS 2 nodes configuration.
See for instance the launch file of
hri_face_detectto understand how it is used.
You should immediately see on the console that some faces are indeed detected
Let’s visualise them:
- start
rviz2:
rviz2
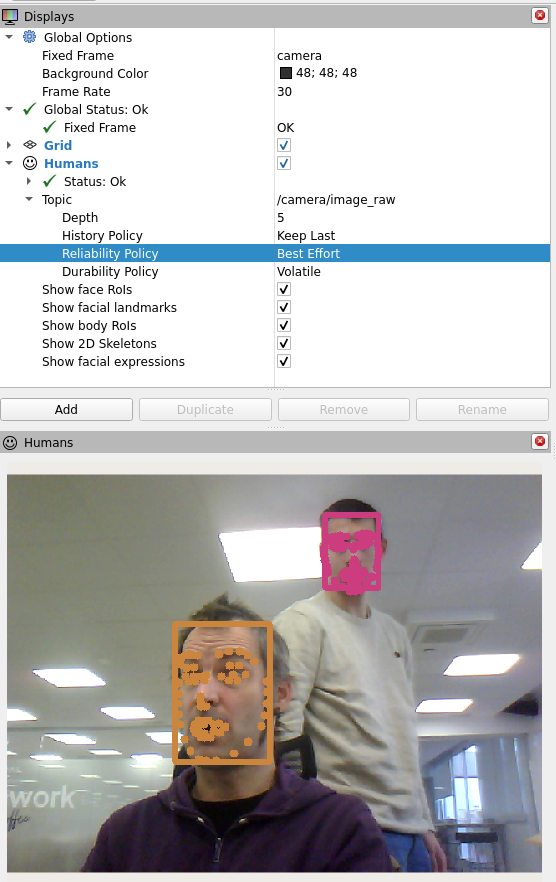
- In
rviz, visualize the detected faces by adding theHumansplugin, which you can find in thehri_rvizplugins group. The plugin setup requires you to specify the image stream you want to use to visualize the detection results, in this case/camera/image_raw. You can also find the plugin as one of those available for the/camera/image_rawtopic.
‼️ Important: set the quality of service (QoS) of the
/camera/image_rawtopic toBest Effort:
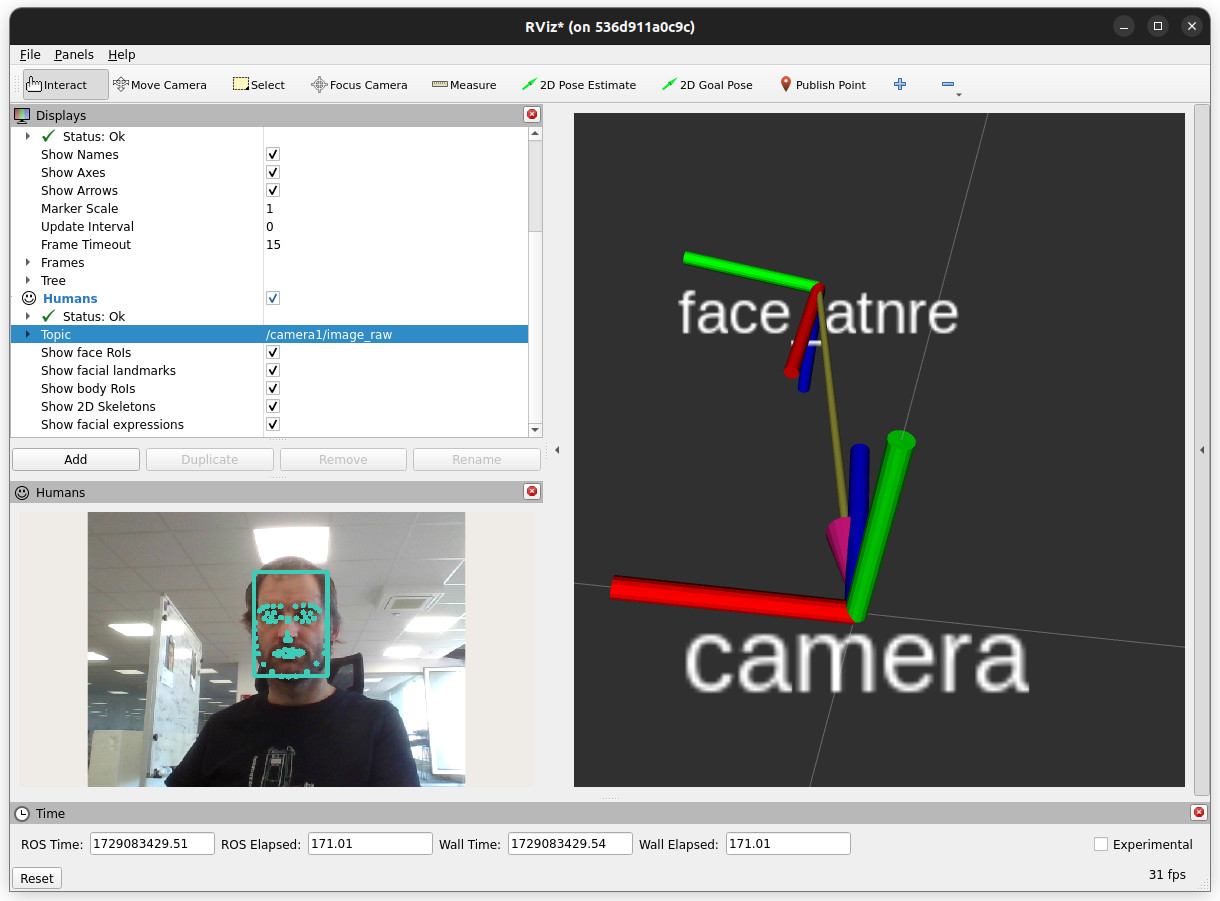
- In
rviz, enable as well thetfplugin, and set the fixed frame tocamera. You should now see a 3D frame, representing the face position and orientation of your face.
➡️ to go deeper
In today’s tutorial, we will not go much further with exploring the ROS4HRI tools and nodes. However, you can find more information:
- HRI’23 presentation: ROS4HRI: A ROS-based Framework for Human-Robot Interaction
- PAL Robotics public documentation that includes multiple tutorials and examples
- on the ROS4HRI wiki page
- in the ROS4HRI (ROS 1) tutorial here
You can also check the ROS4HRI Github organisation and the original paper.
PART 2: the social interaction simulator
Starting the interaction simulator
Instead of running nodes manually, we are now going to use PAL interaction simulator:
To start the simulator:
- stop all the nodes that are running (like
gscam,hri_face_detect,rqt,etc) - in one of your Docker terminals, launch the simulator:
ros2 launch interaction_sim simulator.launch.py
To load a pre-configured scene:
On the screenshot above, the objets (sofa, table, etc) are defined in an custom SVG file.
You can load such a pre-configured scene:
- click on
Settings, thenDownload environment SVG templateand save the file in theexchangefolder (call it for instancescene.svg). - click on
Load environmentand select the file you just saved.
💡 you can open the SVG file in a vector editor like Inkscape to modify the scene (add new objects, change the layout, etc). Check the instructions written in the template itself.
Interaction simulator architecture
The interaction simulator starts several nodes:
The previous two:
gscamto publish images from the webcamhri_face_detectto detect faces in images
And the following new nodes:
hri_person_manager, to ‘combine’ faces, bodies, voices into full personshri_emotion_recognizer, to recognize emotions on the detected facesknowledge_core, an open-source OWL/RDF-based knowledge basehri_visualizationto generate a camera image overlay with the faces, bodies, emotions, etcattention_manager(not open-source), that decides where to look based on the where the faces areexpressive_eyes(not open-source), that procedurally generates the robot’s face and moves the eyescommunication_hub(not open-source), that manages the dialogues with the user (user input speech, and robot output speech)
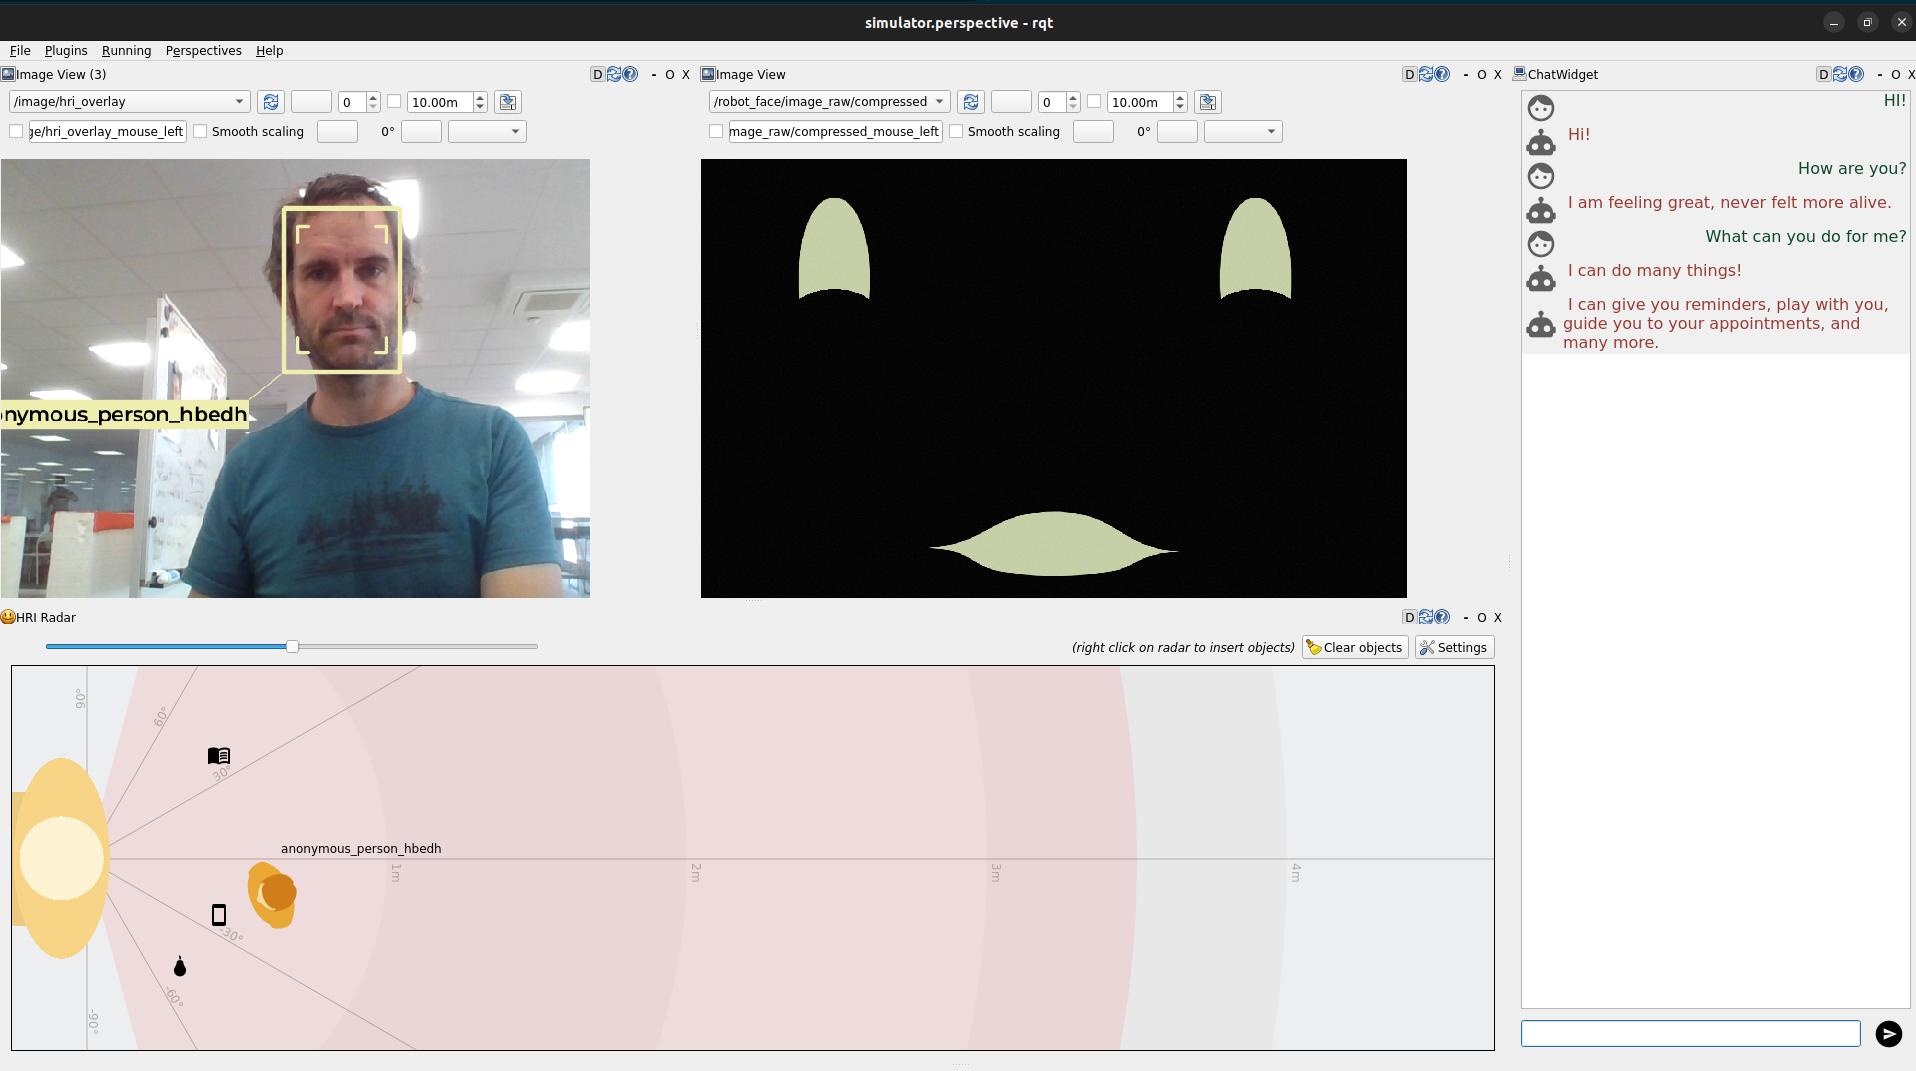
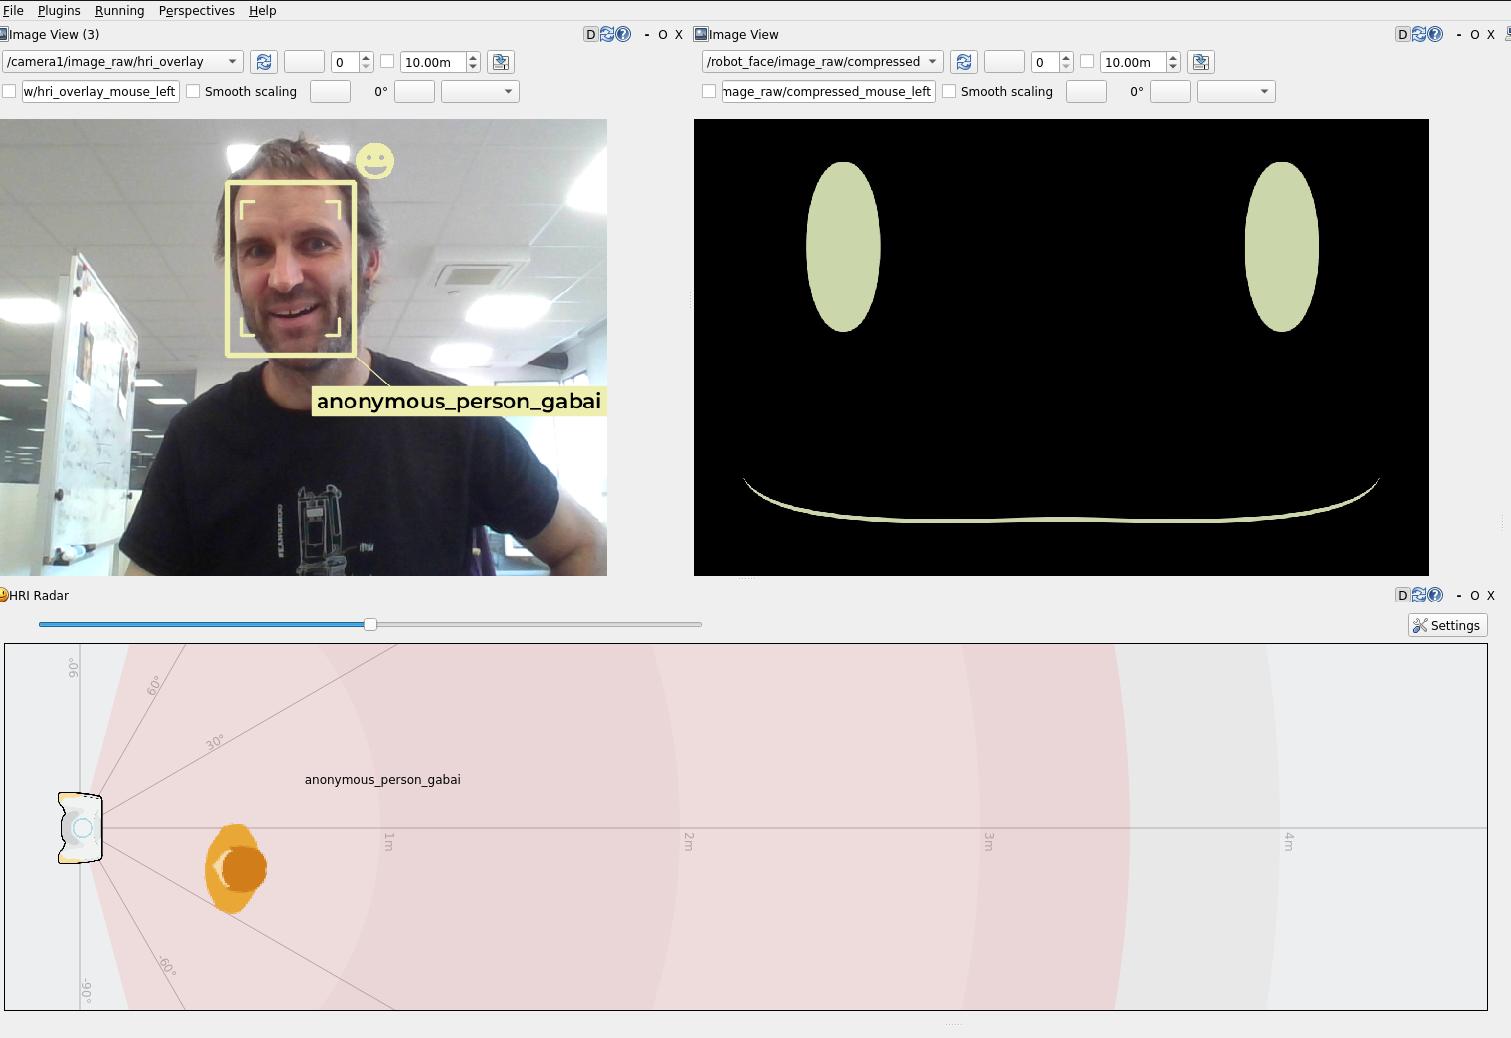
Finally, it launches rqt with two custom plugins:
rqt_human_radar, to visualize the detected people around the robot (and simulated interactions with a knowledge base)rqt_chat, to chat with the robot. When you type a message, it is sent to the ROS4HRI topic/humans/voices/anonymous_speaker/speech, and the robot’s response via the/tts_engine/ttsaction are displayed back.
The next figure shows the architecture of the interaction simulator:

Using the simulator to add symbolic knowledge
When starting the simulator, knowledge_core is also started. knowledge_core
is a simple OWL/RDF-based knowledge base that can be used to store symbolic
information about the world.
By right-clicking on the top-down view of the environment, you can add new objects to the knowledge base:
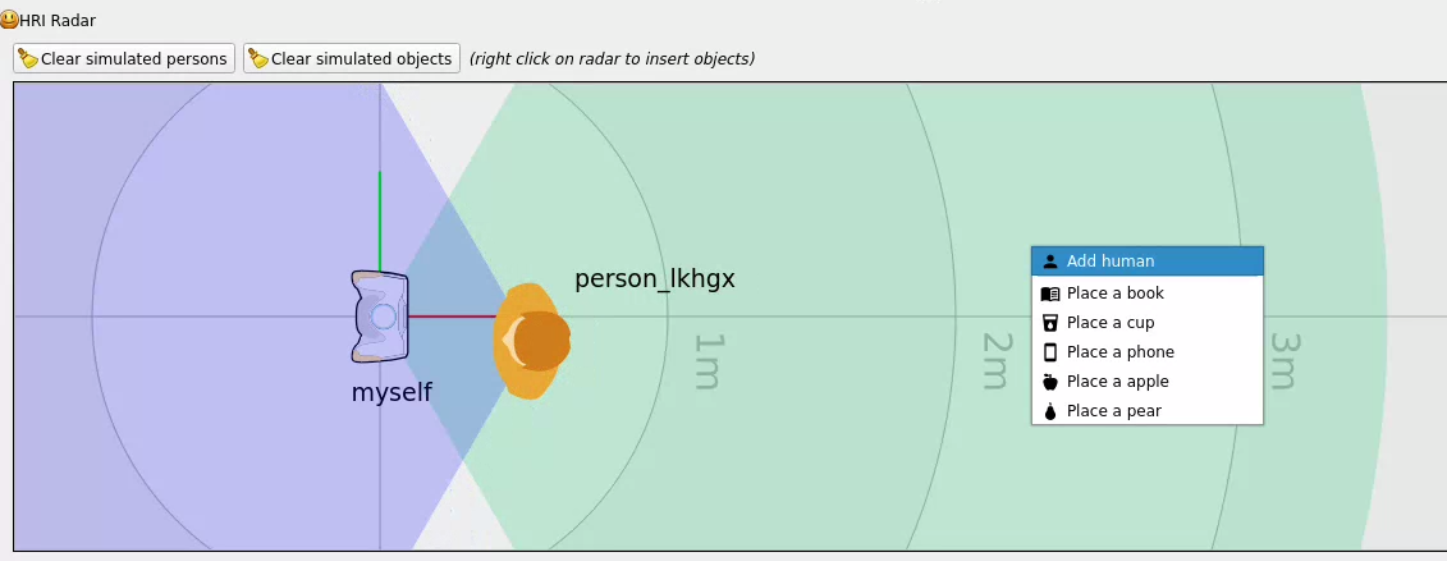
The simulator will then publish the new facts on to the knowledge base,
including whether or not a given object is in the field of view of the robot
and/or humans (eg myself sees cup_abcd or person_lkhgx sees sofa).
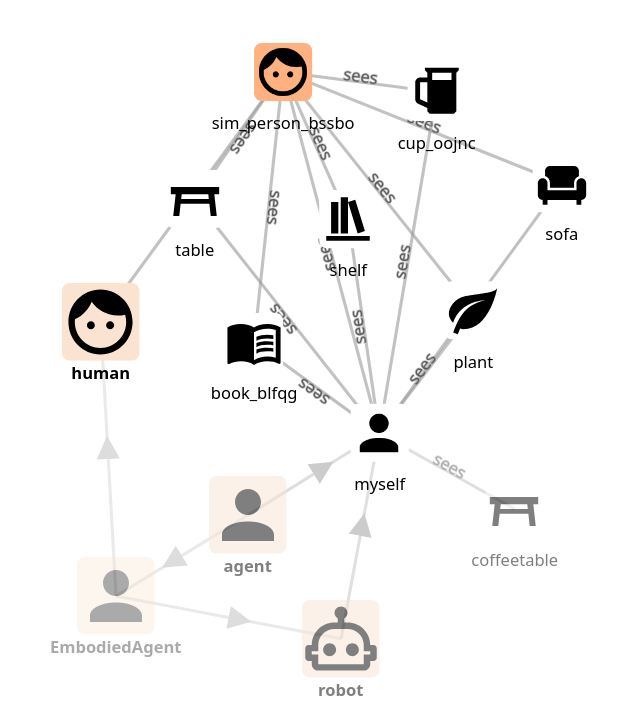
To visualize the knowledge base, we need to start PAL web-based knowledge base viewer.
In a new terminal, start the viewer:
ros2 launch knowledge_core knowledge_viewer.launch.py
Then, open your web browser at http://localhost:8000 to explore the knowledge base.
For instance, with the following scene:
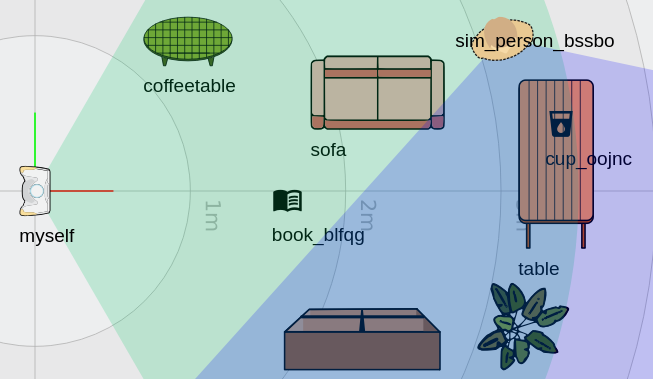
the knowledge base will contain new facts, including:
💡 the robot’s own ‘instance’ is always called
myselfin the knowledge base.For instance
myself sees cup_oojncmeans that the robot sees the cupcup_oojnc.
💡 as of Feb 2025,
rqt_human_radarcomputes and pushes to the knowledge base the following facts:
<object|agent> rdf:type <class>myself sees <object>person_<id> sees <object><object|agent> isIn <zone><object|agent> isOn <object>(note that the field of view of the robot/humans does not take walls into account yet!)
Accessing the knowledge base from Python
You can easily query the knowledge base from Python:
Start ipython3 in the terminal:
ipython3
Then, in the Python shell:
from knowledge_core.api import KB
kb = KB()

kb["* sees *"]
This will return all the facts in the knowledge base that match the pattern *
sees * (ie, all the objects that are seen by someone).
Likewise,
kb["* isIn kitchen"]
will return all the objects (or simulated humans) that are in the kitchen.
You can also create more complex queries by passing a list of semantic patterns and using named variables:
kb[["?h sees ?o", "?o rdf:type dbr:Cup", "?h rdf:type Human"]]
This will return all the facts in the knowledge base where a human sees a cup.
💡 note the
dbr:prefix in front ofCup: the simulator uses the ‘cup’ concept defined in the DBPedia ontology.
➡️ to go deeper
To learn mode about PAL interaction simulator, check PAL Robotics’ public documentation.
PART 3: Building a simple social behaviour
Our first mission controller
A mission controller is a ROS node that orchestrates the robot’s behaviour.
We will implement our first mission controller as a simple Python script that copies your facial expression onto the robot’s face: an emotion mirroring game.
Since creating a complete ROS 2 node from scratch can be a bit tedious, we will
use the rpk tool, a command-line tool created by PAL Robotics, that generates
ROS 2 nodes from templates.
💡
rpkis already install in the Docker container. You can also install it easily on your own machines withpip install rpkAs the generator tool itself does not require ROS, you can use it on any machine, including eg Windows.
Learn more about
rpkon the official documentation.
Step 1: generating the mission controller
- go to your
exchangefolder and create a new workspace:
cd ~/exchange

# you might have to change the rights of the folder
sudo chown user:user .

mkdir ws
cd ws
- run
rpkto create the mission controller:
$ rpk create -p src/ mission
ID of your application? (must be a valid ROS identifier without spaces or hyphens. eg 'robot_receptionist')
emotion_mirror
Full name of your skill/application? (eg 'The Receptionist Robot' or 'Database connector', press Return to use the ID. You can change it later)


Choose a template:
1: base robot supervisor [python]
2: robot supervisor with pre-filled intent handlers [python]
3: robot supervisor with a GUI and pre-filled intent handlers [python]
4: complete supervisor example, using a basic chatbot to manage interactions with users [python]
5: complete supervisor example, using LLMs to manage interactions with users [python]

Your choice? 1

What robot are you targeting?
1: Generic robot (generic)
2: Generic PAL robot/simulator (generic-pal)
3: PAL ARI (ari)
4: PAL TIAGo (tiago)
5: PAL TIAGo Pro (tiago-pro)
6: PAL TIAGo Head (tiago-head)

Your choice? (default: 1: generic) 2
Choose a base robot supervisor template, and the generic-pal robot.
The tool will then create a complete ROS 2 mission controller, ready to listen
to incoming user intents (eg, ROS messages pubished on the /intents topic).
- build and source the workspace:
colcon build

source install/setup.bash
- start the mission controller:
ros2 launch emotion_mirror emotion_mirror.launch.py
If you now write a line in the rqt_chat plugin, you should see the mission
controller reacting to it:
[...]
[run_app-1] [INFO] [1729672049.773179100] [emotion_mirror]: Listening to /intents topic
[run_app-1] [INFO] [1729672099.529532393] [emotion_mirror]: Received an intent: __raw_user_input__
[run_app-1] [INFO] [1729672099.529859652] [emotion_mirror]: Processing input: __raw_user_input__
💡
rqt_chatdisplays ‘Processing…’ as it waits for a response from the mission controller. The mission controller is not doing anything yet, so ‘Processing…’ is displayed indefinitely (for now!).
The intent __raw_user_input__ is emitted by the communication_hub, and is a
special intent that essentially means: “I don’t know what to do with this input,
but I received it”.
Since we are not doing anything with the input yet (like trying to figure out what the user wants be calling a dedicated chatbot), the communication hub simply sends back the same message with this intent.
Step 2: add basic interactivity
Modify the template to say something back. To start with, we will always respond the same thing.
- open
mission_controller.py:
cd src/emotion_mirror/emotion_mirror
nano mission_controller.py
- in the constructor, create a action client:
#...
from rclpy.action import ActionClient
from tts_msgs.action import TTS
#...

class MissionController(Node):
    def __init__(self):

        #...
        self.tts = ActionClient(self, TTS, '/say')
        self.tts.wait_for_server()
- modify the handling on incoming intents to say something back:
    def on_intent(self, msg):
        #...

        if msg.intent == Intent.RAW_USER_INPUT:
            goal = TTS.Goal()
            goal.input = "I'm the famous emotion mirroring robot! (but I'm not great at chatting yet)"
            self.tts.send_goal_async(goal)
(up to you to come up with something funny!)
Re-run colcon build and relaunch your mission controller to test it with the
chat interface.
Since we are using communication_hub as a middle-man, we can also use markup
in our sentences to change the expression of the robot.
For example, you can use the following markup to display an happy face:
"<set expression(happy)> I'm the famous emotion mirroring robot! My holiday was great <set expression(amazed)>, thank you for asking! <set expression(neutral)>"
➡️ to go deeper
You can check the online documentation of the markup language used by the
communication_hubto get the list of available actions and expressions.Note that
communication_hub, while available in binary form in the Docker image, is not open-source. Alternatively, you can also simply manually set the robot’s expression by publishing on the/robot_face/expressiontopic (as we do below).
Step 3: emotion mimicking game
We can now extend our mission controller to implement our emotion mirroring game.
To get the recognised facial expression of the current user, we can use the ROS4HRI tools:
For instance:
from hri import HRIListener

hri_listener = HRIListener("mimic_emotion_hrilistener")

for face_id, face in hri_listener.faces.items():
    if face.expression:
            print(f"Face {face_id} shows expression {face.expression}")
Then, we can set the same expression onto the robot face:
from hri_msgs.msg import Expression

expression_pub = self.create_publisher(Expression, "/robot_face/expression", QoSProfile(depth=10))

msg = Expression()
msg.expression = "happy" # see Expression.msg for all available expressions
expression_pub.publish(msg)
Modify the mission controller to add a background ‘job’ of checking for people’s face, and accordingly set the robot’s expression:
Add a run() method at the bottom of your mission controller:
def run(self) -> None:

    self.get_logger().info("Checking expressions...")

    for face_id, face in self.hri_listener.faces.items():
        if face.expression:
                print(f"Face {face_id} shows expression {face.expression}")

                msg = Expression()
                msg.expression = face.expression
                self.expression_pub.publish(msg)
Then, in the __init__ constructor, create the HRI listener, the expression
publisher, and a timer to regularly call the run() method:
def __init__(self):


    # ...

    self.hri_listener = HRIListener("mimic_emotion_hrilistener")
    self.expression_pub = self.create_publisher(Expression, "/robot_face/expression", QoSProfile(depth=10))

    self._timer = self.create_timer(0.1, self.run) # check at 10Hz
The final complete script should look like:
import json

from rclpy.node import Node
from rclpy.qos import QoSProfile
from rclpy.action import ActionClient

from hri_actions_msgs.msg import Intent
from hri_msgs.msg import Expression
from tts_msgs.action import TTS
from hri import HRIListener

class MissionController(Node):

    def __init__(self) -> None:
        super().__init__('app_emotion_mirror')

        self.get_logger().info("Initialising...")

        self._intents_sub = self.create_subscription(
            Intent,
            '/intents',
            self.on_intent,
            10)
        self.get_logger().info("Listening to %s topic" %
                               self._intents_sub.topic_name)

        self.hri_listener = HRIListener("mimic_emotion_hrilistener")
        self.expression_pub = self.create_publisher(Expression, "/robot_face/expression", QoSProfile(depth=10))
        self.last_expression = ""

        self.tts = ActionClient(self, TTS, '/say')
        self.tts.wait_for_server()

        self._timer = self.create_timer(0.1, self.run) # check at 10Hz

    def __del__(self):
        self.get_logger().info("Destroying Mission Controller")
        self.destroy_subscription(self._intents_sub)

    def on_intent(self, msg) -> None:

        self.get_logger().info("Received an intent: %s" % msg.intent)

        data = json.loads(msg.data) if msg.data else {}  # noqa: F841
        source = msg.source  # noqa: F841
        modality = msg.modality  # noqa: F841
        confidence = msg.confidence  # noqa: F841
        priority_hint = msg.priority  # noqa: F841

        if msg.intent == Intent.RAW_USER_INPUT:
            self.get_logger().info(f"Processing input: {msg.intent} -> {data}")
            goal = TTS.Goal()
            goal.input = "I'm the famous emotion mirroring robot!"
            self.tts.send_goal_async(goal)
        else:
            self.get_logger().warning("I don't know how to process intent "
                                      "<%s>!" % msg.intent)
    def run(self) -> None:

        faces = list(self.hri_listener.faces.items())
        if faces:
            # only consider the first detected face
            face_id, face = faces[0]
            if face.expression and face.expression != self.last_expression:
                    expression = face.expression.name.lower()
                    print(f"Face {face_id} shows expression {expression}")

                    goal = TTS.Goal()
                    goal.input = f"you look {expression}. Same for me!"
                    self.tts.send_goal_async(goal)

                    msg = Expression()
                    msg.expression = expression
                    self.expression_pub.publish(msg)

                    self.last_expression = face.expression
CHAPTER 3: Integration with LLMs
Adding a chatbot
Step 1: creating a chatbot
- use
rpkto create a newchatbotskill using the basic chabot intent extraction template:
$ rpk create -p src intent
ID of your application? (must be a valid ROS identifier without spaces or hyphens. eg 'robot_receptionist')
chatbot
Full name of your skill/application? (eg 'The Receptionist Robot' or 'Database connector', press Return to use the ID. You can change it later)


Choose a template:
1: basic chatbot template [python]
2: complete intent extraction example: LLM bridge using the OpenAI API (ollama, chatgpt) [python]

Your choice? 1

What robot are you targeting?
1: Generic robot (generic)
2: Generic PAL robot/simulator (generic-pal)
3: PAL ARI (ari)
4: PAL TIAGo (tiago)
5: PAL TIAGo Pro (tiago-pro)
6: PAL TIAGo Head (tiago-head)

Your choice? (default: 1: generic) 2
Compile and run the chatbot:
colcon build
source install/setup.bash
ros2 launch chatbot chatbot.launch.py
If you know type a message in the rqt_chat plugin, you should see the chatbot
responding to it:
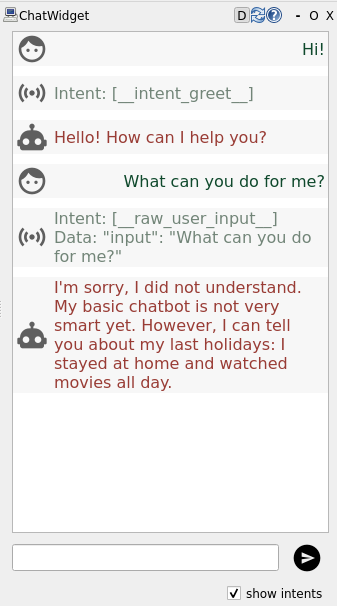
You can also see in the chat window the intents that the chatbot has
identified in the user input. For now, our basic chatbot only recognises the
__intent_greet__ intent when you type Hi or Hello.
Step 2: integrating the chatbot with the mission controller
To fully understand the intent pipeline, we will modify the chatbot to recognise a ‘pick up’ intent, and the mission controller to handle it.
- modify your chatbot to check whether incoming speech matches
[please] pick up [the] <object>:
import re

def contains_pickup(sentence):
    sentence = sentence.lower()

    # matches sentences like: [please] pick up [the] <object> and return <object>
    pattern = r"(?:please\s+)?pick\s+up\s+(?:the\s+)?(\w+)"
    match = re.search(pattern, sentence)
    if match:
        return match.group(1)
- then, in the
on_get_responsefunction, check if the incoming speech matches the pattern, and if so, return a__intent_grab_object__:
def on_get_response(self, request, response):

    #...

    pick_up_object = self.contains_pickup(input)
    if pick_up_object:
        self.get_logger().warn(f"I think the user want to pick up a {pick_up_object}. Sending a GRAB_OBJECT intent")
        intent = Intent(intent=Intent.GRAB_OBJECT,
                        data=json.dumps({"object": pick_up_object}),
                        source=user_id,
                        modality=Intent.MODALITY_SPEECH,
                        confidence=.8)
        suggested_response = f"Sure, let me pick up this {pick_up_object}"
    # elif ...
💡 the
Intentmessage is defined in thehri_actions_msgspackage, and contains the intent, the data associated with the intent, the source of the intent (here, the currentuser_id), the modality (here,speech), and the confidence of the recognition.Check the Intents documentation on PAL website for details, or directly the Intent.msg definition.
Test your updated chatbot by recompiling the workspace (colcon build) and relaunching the chatbot.
If you now type pick up the cup in the chat window, you should see the chatbot
recognising the intent and sending a GRAB_OBJECT intent to the mission controller.
-
finally, modify the mission controller function handling inbound intents, in order to manage the
GRAB_OBJECTintent. Opendef on_intent(self, msg): #... if msg.intent == Intent.GRAB_OBJECT: # on a real robot, you would call here a manipulation skill goal = TTS.Goal() goal.input = f"<set expression(tired)> That {data['object']} is really heavy...! <set expression(neutral)>" self.tts.send_goal_async(goal) # ...
Re-compile and re-run the mission controller. If you now type pick up the cup
in the chat window, you should see the mission controller reacting to it.
➡️ to go deeper
In this example, we directly use the
/sayskill to respond to the user.When developing a full application, you usually want to split your architecture into multiple nodes, each responsible for a specific task.
The PAL application model, based on the RobMoSys methodology, encourages the development of a single mission controller, and a series of tasks and skills that are orchestrated by the mission controller.
You can read more about this model on the PAL documentation website.
Integrating with a Large Language Model (LLM)
Next, let’s integrate with an LLM.
Step 1: install ollama
ollama is an open-source tool that provides a simple REST API to interact with
a variety of LLMs. It makes it easy to install different LLMs, and to call them
using the same REST API as, eg, OpenAI’s ChatGPT.
To install ollama on your machine, follow the instructions on the
official repository:
curl -fsSL https://ollama.com/install.sh | sh
Once it is installed, you can start the ollama server with:
ollama serve
Open a new Docker terminal, and run the following command to download a first model and check it works:
ollama run llama3.2:1b
💡 Visit the
ollamamodel page to see the list of available models.Depending on the size of the model and your computer configuration, the response time can be quite long.
If you have a NVIDIA GPU, you might want to relaunch your Docker container with GPU support. Check the instructions on the NVidia website.
Alternatively, you can run
ollamaon your host machine, as we will interact with it via a REST API.
Step 2: calling ollama from the chatbot
ollama can be accessed from your code either by calling the REST API
directly, or by using the ollama Python binding. While the REST API is more
flexible (and makes it possible to easily use other OpenAI-compatible services,
like ChatGPT), the Python binding is very easy to use.
💡 if you are curious about the REST API, use
rpk’s LLM chatbot template to generate an example of a chatbot that callsollamavia the REST API.
- install the
ollamapython binding inside your Docker image:
pip install ollama
- Modify your chatbot to connect to
ollama, using a custom prompt. Openchatbot/chatbot/node_impl.pydo the following changes:
# add to the imports
from ollama import Client

# ...

class IntentExtractorImpl(Node):

    # modify the constructor:
    def __init__(self) -> None:
        # ...

        self._ollama_client = Client()
        # if ollama does not run on the local host, you can specify the host and
        # port. For instance:
        # self._ollama_client = Client("x.x.x.x:11434")

        # dialogue history
        self.messages = [
            {"role": "system",
             "content": """
                You are a helpful robot, always eager to help.
                You always respond with concise and to-the-point answers.
             """
             }]

    # modify on_get_response:
    def on_get_response(self, request: GetResponse.Request, response: GetResponse.Response):

        user_id = request.user_id
        input = request.input

        self.get_logger().info(
            f"new input from {user_id}: {input}... sending it to the LLM")
        self._nb_requests += 1

        self.messages.append({"role": "user", "content": input})

        llm_res = self._ollama_client.chat(
            messages=self.messages,
            model="llama3.2:1b"
        )

        content = llm_res.message.content

        self.get_logger().info(f"The LLM answered: {content}")

        self.messages.append({"role": "assistant", "content": content})

        response.response = content
        response.intents = []

        return response
As you can see, calling ollama is as simple as creating a Client object and
calling its chat method with the messages to send to the LLM and the model to
use.
In this example, we append to the chat history (self.messages) the user input
and the LLM response after each interaction, thus building a complete dialogue.
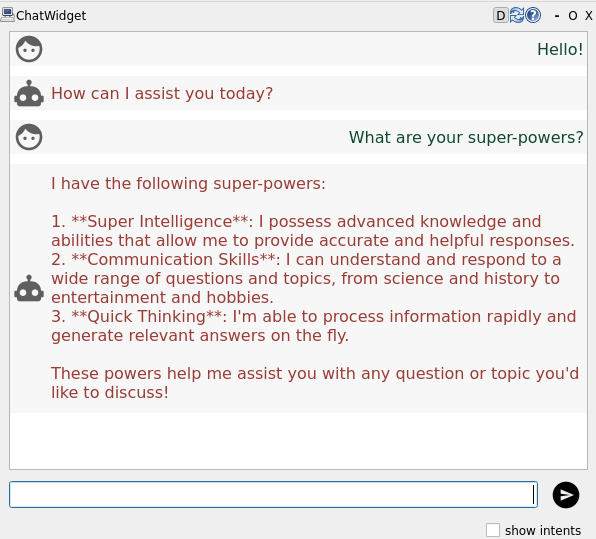
Recompile and restart the chatbot. If you now type a message in the chat window, you should see the chatbot responding with a text generated by the LLM:
💡 depending on the model you use, the response time can be quite long. After 10s,
communication_hubwill time out. In that case, the chatbot answer will not be displayed in the chat window.
Step 3: extract user intents
To recognise intents from the LLM response, we can use a combination of prompt engineering and LLM structured output.
- to generate structured output (ie, a JSON-structured response that includes the recognised intents), we first need to write a Python object that corresponds to the expected output of the LLM:
from pydantic import BaseModel
from typing import Literal
from hri_actions_msgs.msg import Intent

# Define the data models for the chatbot response and the user intent
class IntentModel(BaseModel):
    type: Literal[Intent.BRING_OBJECT,
                  Intent.GRAB_OBJECT,
                  Intent.PLACE_OBJECT,
                  Intent.GUIDE,
                  Intent.MOVE_TO,
                  Intent.SAY,
                  Intent.GREET,
                  Intent.START_ACTIVITY,
                  ]
    object: str | None
    recipient: str | None
    input: str | None
    goal: str | None

class ChatbotResponse(BaseModel):
    verbal_ack: str | None
    user_intent: IntentModel | None
Here, we use the type BaseModel from the pydantic library so that we can
generate the formal model corresponding to this Python object (using the JSON
schema specification).
- then, modify the chatbot to force the LLM to return a JSON-structured response that includes the recognised intents:
    # ...

    def on_get_response(self, request: GetResponse.Request, response: GetResponse.Response):

        user_id = request.user_id
        input = request.input

        self.get_logger().info(
            f"new input from {user_id}: {input}... sending it to the LLM")
        self._nb_requests += 1

        self.messages.append({"role": "user", "content": input})

        llm_res = self._ollama_client.chat(
            messages=self.messages,
            model="llama3.2:1b",
            format=ChatbotResponse.model_json_schema()
        )

        json_res = ChatbotResponse.model_validate_json(llm_res.message.content)

        self.get_logger().info(f"The LLM answered: {json_res}")

        verbal_ack = json_res.verbal_ack
        if verbal_ack:
            # if we have a verbal acknowledgement, add it to the dialogue history,
            # and send it to the user
            self.messages.append({"role": "assistant", "content": verbal_ack})
            response.response = verbal_ack

        user_intent = json_res.user_intent
        if user_intent:
            response.intents = [Intent(
                intent=user_intent.type,
                data=json.dumps(user_intent.model_dump())
            )]

        return response
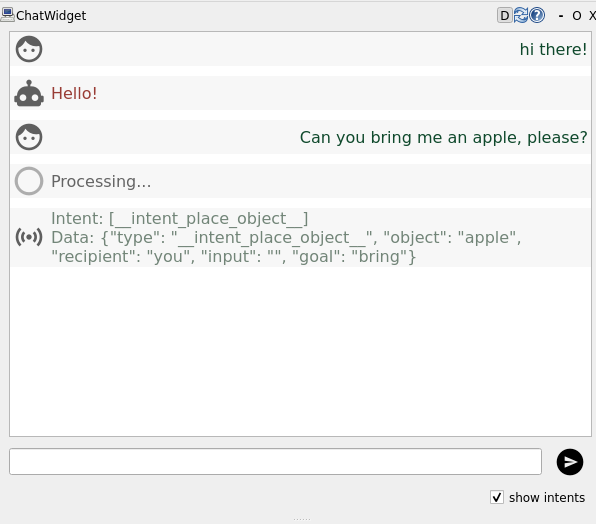
Now, the LLM will always return a JSON-structured response that includes an intent (if
one was recognised), and a verbal acknowledgement. For instance, when asking the robot to bring an apple, it returns an intent PLACE_OBJECT with the object apple:
Step 4: prompt engineering to improve intent recognition
To improve the intent recognition, we can use prompt engineering: we can provide the LLM with a prompt that will guide it towards generating a response that includes the intents we are interested in.
One key trick is to provide the LLM with examples of the intents we are interested in.
Here an example of a longer prompt, that would yield better results:
PROMPT = """
You are a friendly robot called $robot_name. You try to help the user to the best of your abilities.
You are always helpful, and ask further questions if the desires of the user are unclear.
Your answers are always polite yet concise and to-the-point.

Your aim is to extract the user goal.

Your response must be a JSON object with the following fields (both are optional):
- verbal_ack: a string acknowledging the user request (like 'Sure', 'I'm on it'...)
- user_intent: the user overall goal (intent), with the following fields:
  - type: the type of intent to perform (e.g. "__intent_say__", "__intent_greet__", "__intent_start_activity__", etc.)
  - any thematic role required by the intent. For instance: `object` to
    relate the intent to the object to interact with (e.g. "lamp",
    "door", etc.)

Importantly, `verbal_ack` is meant to be a *short* acknowledgement sentence,
unconditionally uttered by the robot, indicating that you have understood the request -- or that we need more information.
For more complex verbal actions, return a `__intent_say__` instead.

However, for answers to general questions that do not require any action
(eg: 'what is your name?'), the 'user_intent' field can be omitted, and the
'verbal_ack' field should contain the answer.

The user_id of the person you are talking to is $user_id. Always use this ID when referring to the person in your responses.

Examples
- if the user says 'Hello robot', you could respond:
{
    "user_intent": {"type": "__intent_greet__", "recipient": "$user_id"}
}

- if the user says 'What is your name?', you could respond:
{
    "verbal_ack":"My name is $robot_name. What is your name?"
}

- if the user say 'take a fruit', you could respond (assuming a object 'apple1' of type 'Apple' is visible):
{
    "user_intent": {
            "type":"__intent_grab_object__",
            "object":"apple1",
    },
    "verbal_ack": "Sure"
}

- if the user say 'take a fruit', but you do not know about any fruit. You could respond:
{
    "verbal_ack": "I haven't seen any fruits around. Do you want me to check in the kitchen?"
}

- the user says: 'clean the table'. You could return:
{
    "user_intent": {
        "type":"__intent_start_activity__",
        "object": "cleaning_table"
    },
    "verbal_ack": "Sure, I'll get started"
}

If you are not sure about the intention of the user, return an empty user_intent and ask for confirmation with the verbal_ack field.
"""
This prompt uses Python’s templating system to include the robot’s name and the user’s ID in the prompt.
You can use this prompt in your script by substituting the variables with the actual values:
from string import Template
actual_prompt = Template(PROMPT).safe_substitute(robot_name="Robbie", user_id="Alice")
Then, you can use this prompt in the ollama call:
# ...

def __init(self) -> None:

    # ...

    self.messages = [
        {"role": "system",
            "content": Template(PROMPT).safe_substitute(robot_name="Robbie", user_id="user1")
            }]

    # ...
Closing the loop: integrating LLM and symbolic knowledge representation
Finally, we can use the knowledge base to improve the intent recognition.
For instance, if the user asks the robot to bring the apple, we can use the
knowledge base to check whether an apple is in the field of view of the robot.
💡 it is often convenient to have a Python interpreter open to quickly test knowledge base queries.
Open
ipython3in a terminal from within your Docker image, and then:from knowledge_core.api import KB; kb = KB() kb["* sees *"] # etc.
First, let’s query the knowledge base for all the objects that are visible to the robot:
from knowledge_core.api import KB

# ...

def __init__(self) -> None:

    # ...

    self.kb = KB()


def environment(self) -> str:
    """ fetch all the objects and humans visible to the robot,
    get for each of them their class and label, and return a string
    that list them all.
    """

    environment_description = ""

    seen_objects = self.kb["myself sees ?obj"]
    for obj in [item["obj"] for item in seen_objects]:
        details= self.kb.details(obj)
        label= details["label"]["default"]
        classes= details["attributes"][0]["values"]
        class_name= None
        if classes:
                class_name= classes[0]["label"]["default"]
                environment_description += f"- I see a {class_name} labeled {label}.\n"
        else:
            environment_description += f"- I see {label}.\n"

    self.get_logger().info(
        f"Environment description:\n{environment_description}")
    return environment_description
💡 the
kb.detailsmethod returns a dictionary with details about a given knowledge concept. Theattributesfield contains e.g. the class of the object (if known or inferred by the knowledg base).
➡️ to go deeper
To inspect in details the knowledge base, we recommend using Protégé, an open-source tool to explore and modify ontologies.
The ontology used by the robot (and the interaction simulator) is stored in
/opt/pal/alum/share/oro/ontologies/oro.owl. Copy this file to your~/exchangefolder to access it from your host and inspect it with Protégé.
We can then use this information to ground the user intents in the physical world of the robot.
First, add the following two lines at the end of your prompt template:
This is a description of the environment:

$environment
Then, add a new method to your chatbot to generate the prompt:
def __init__(self) -> None:

    # ...

    self.messages = [
        {"role": "system",
            "content": self.prepare_prompt("user1")
            }]

    # ...

def prepare_prompt(self, user_id: str) -> str:

    environment = self.environment()

    return Template(PROMPT).safe_substitute(robot_name="Robbie",
                                            environment=environment,
                                            user_id=user_id)
You could also call the environment method before each call to the LLM, to get the latest environment description.
Re-compile and restart your chatbot. You can now ask the robot e.g. what it sees.
The final chatbot code should look like:
import json
from ollama import Client

from knowledge_core.api import KB

from rclpy.lifecycle import Node
from rclpy.lifecycle import State
from rclpy.lifecycle import TransitionCallbackReturn
from rcl_interfaces.msg import ParameterDescriptor
from rclpy.action import ActionServer, GoalResponse

from chatbot_msgs.srv import GetResponse, ResetModel
from hri_actions_msgs.msg import Intent
from i18n_msgs.action import SetLocale
from i18n_msgs.srv import GetLocales

from diagnostic_msgs.msg import DiagnosticArray, DiagnosticStatus, KeyValue

from pydantic import BaseModel
from typing import Literal
from hri_actions_msgs.msg import Intent
from string import Template

PROMPT = """
You are a friendly robot called $robot_name. You try to help the user to the best of your abilities.
You are always helpful, and ask further questions if the desires of the user are unclear.
Your answers are always polite yet concise and to-the-point.

Your aim is to extract the user goal.

Your response must be a JSON object with the following fields (both are optional):
- verbal_ack: a string acknowledging the user request (like 'Sure', 'I'm on it'...)
- user_intent: the user overall goal (intent), with the following fields:
  - type: the type of intent to perform (e.g. "__intent_say__", "__intent_greet__", "__intent_start_activity__", etc.)
  - any thematic role required by the intent. For instance: `object` to
    relate the intent to the object to interact with (e.g. "lamp",
    "door", etc.)

Importantly, `verbal_ack` is meant to be a *short* acknowledgement sentence,
unconditionally uttered by the robot, indicating that you have understood the request -- or that we need more information.
For more complex verbal actions, return a `__intent_say__` instead.

However, for answers to general questions that do not require any action
(eg: 'what is your name?'), the 'user_intent' field can be omitted, and the
'verbal_ack' field should contain the answer.

The user_id of the person you are talking to is $user_id. Always use this ID when referring to the person in your responses.

Examples
- if the user says 'Hello robot', you could respond:
{
    "user_intent": {"type": "__intent_greet__", "recipient": "$user_id"}
}

- if the user says 'What is your name?', you could respond:
{
    "verbal_ack":"My name is $robot_name. What is your name?"
}

- if the user say 'take a fruit', you could respond (assuming a object 'apple1' of type 'Apple' is visible):
{
    "user_intent": {
            "type":"__intent_grab_object__",
            "object":"apple1",
    },
    "verbal_ack": "Sure"
}

- if the user say 'take a fruit', but you do not know about any fruit. You could respond:
{
    "verbal_ack": "I haven't seen any fruits around. Do you want me to check in the kitchen?"
}

- the user says: 'clean the table'. You could return:
{
    "user_intent": {
        "type":"__intent_start_activity__",
        "object": "cleaning_table"
    },
    "verbal_ack": "Sure, I'll get started"
}

If you are not sure about the intention of the user, return an empty user_intent and ask for confirmation with the verbal_ack field.

This is a description of the environment:

$environment
"""


# Define the data models for the chatbot response and the user intent
class IntentModel(BaseModel):
    type: Literal[Intent.BRING_OBJECT,
                  Intent.GRAB_OBJECT,
                  Intent.PLACE_OBJECT,
                  Intent.GUIDE,
                  Intent.MOVE_TO,
                  Intent.SAY,
                  Intent.GREET,
                  Intent.START_ACTIVITY,
                  ]
    object: str | None
    recipient: str | None
    input: str | None
    goal: str | None


class ChatbotResponse(BaseModel):
    verbal_ack: str | None
    user_intent: IntentModel | None
##################################################

class IntentExtractorImpl(Node):

    def __init__(self) -> None:
        super().__init__('intent_extractor_chatbot')

        # Declare ROS parameters. Should mimick the one listed in config/00-defaults.yaml
        self.declare_parameter(
            'my_parameter', "my_default_value.",
            ParameterDescriptor(
                description='Important parameter for my chatbot')
        )

        self.get_logger().info("Initialising...")

        self._get_response_srv = None
        self._reset_srv = None
        self._get_supported_locales_server = None
        self._set_default_locale_server = None

        self._timer = None
        self._diag_pub = None
        self._diag_timer = None

        self.kb = KB()

        self._nb_requests = 0

        self._ollama_client = Client()
        # if ollama does not run on the local host, you can specify the host and
        # port. For instance:
        # self._ollama_client = Client("x.x.x.x:11434")

        self.messages = [
            {"role": "system",
             "content": self.prepare_prompt("user1")
             }]

        self.get_logger().info('Chatbot chatbot started, but not yet configured.')

    def environment(self) -> str:
        environment_description = ""

        seen_objects = self.kb["myself sees ?obj"]
        for obj in [item["obj"] for item in seen_objects]:
            details = self.kb.details(obj)
            label = details["label"]["default"]
            classes = details["attributes"][0]["values"]
            class_name = None
            if classes:
                class_name = classes[0]["label"]["default"]
                environment_description += f"- I see a {class_name} labeled {label}.\n"
            else:
                environment_description += f"- I see {label}.\n"

        self.get_logger().info(
            f"Environment description:\n{environment_description}")
        return environment_description

    def prepare_prompt(self, user_id: str) -> str:

        environment = self.environment()

        return Template(PROMPT).safe_substitute(robot_name="Robbie",
                                                environment=environment,
                                                user_id=user_id)

    def on_get_response(self, request: GetResponse.Request, response: GetResponse.Response):

        user_id = request.user_id
        input = request.input

        self.get_logger().info(
            f"new input from {user_id}: {input}... sending it to the LLM")
        self._nb_requests += 1

        self.messages.append({"role": "user", "content": input})

        llm_res = self._ollama_client.chat(
            messages=self.messages,
            # model="llama3.2:1b",
            model="phi4",
            format=ChatbotResponse.model_json_schema()
        )

        json_res = ChatbotResponse.model_validate_json(llm_res.message.content)

        self.get_logger().info(f"The LLM answered: {json_res}")

        verbal_ack = json_res.verbal_ack
        if verbal_ack:
            self.messages.append({"role": "assistant", "content": verbal_ack})
            response.response = verbal_ack

        user_intent = json_res.user_intent
        if user_intent:
            response.intents = [Intent(
                intent=user_intent.type,
                data=json.dumps(user_intent.model_dump())
            )]

        return response

    def on_reset(self, request: ResetModel.Request, response: ResetModel.Response):
        self.get_logger().info('Received reset request. Not implemented yet.')
        return response

    def on_get_supported_locales(self, request, response):
        response.locales = []  # list of supported locales; empty means any
        return response

    def on_set_default_locale_goal(self, goal_request):
        return GoalResponse.ACCEPT

    def on_set_default_locale_exec(self, goal_handle):
        """Change here the default locale of the chatbot."""
        result = SetLocale.Result()
        goal_handle.succeed()
        return result

    #################################
    #
    # Lifecycle transitions callbacks
    #
    def on_configure(self, state: State) -> TransitionCallbackReturn:

        # configure and start diagnostics publishing
        self._nb_requests = 0
        self._diag_pub = self.create_publisher(
            DiagnosticArray, '/diagnostics', 1)
        self._diag_timer = self.create_timer(1., self.publish_diagnostics)

        # start advertising supported locales
        self._get_supported_locales_server = self.create_service(
            GetLocales, "~/get_supported_locales", self.on_get_supported_locales)

        self._set_default_locale_server = ActionServer(
            self, SetLocale, "~/set_default_locale",
            goal_callback=self.on_set_default_locale_goal,
            execute_callback=self.on_set_default_locale_exec)

        self.get_logger().info("Chatbot chatbot is configured, but not yet active")
        return TransitionCallbackReturn.SUCCESS

    def on_activate(self, state: State) -> TransitionCallbackReturn:
        """
        Activate the node.

        You usually want to do the following in this state:
        - Create and start any timers performing periodic tasks
        - Start processing data, and accepting action goals, if any

        """
        self._get_response_srv = self.create_service(
            GetResponse, '/chatbot/get_response', self.on_get_response)
        self._reset_srv = self.create_service(
            ResetModel, '/chatbot/reset', self.on_reset)

        # Define a timer that fires every second to call the run function
        timer_period = 1  # in sec
        self._timer = self.create_timer(timer_period, self.run)

        self.get_logger().info("Chatbot chatbot is active and running")
        return super().on_activate(state)

    def on_deactivate(self, state: State) -> TransitionCallbackReturn:
        """Stop the timer to stop calling the `run` function (main task of your application)."""
        self.get_logger().info("Stopping chatbot...")

        self.destroy_timer(self._timer)
        self.destroy_service(self._get_response_srv)
        self.destroy_service(self._reset_srv)

        self.get_logger().info("Chatbot chatbot is stopped (inactive)")
        return super().on_deactivate(state)

    def on_shutdown(self, state: State) -> TransitionCallbackReturn:
        """
        Shutdown the node, after a shutting-down transition is requested.

        :return: The state machine either invokes a transition to the
            "finalized" state or stays in the current state depending on the
            return value.
            TransitionCallbackReturn.SUCCESS transitions to "finalized".
            TransitionCallbackReturn.FAILURE remains in current state.
            TransitionCallbackReturn.ERROR or any uncaught exceptions to
            "errorprocessing"
        """
        self.get_logger().info('Shutting down chatbot node.')
        self.destroy_timer(self._diag_timer)
        self.destroy_publisher(self._diag_pub)

        self.destroy_service(self._get_supported_locales_server)
        self._set_default_locale_server.destroy()

        self.get_logger().info("Chatbot chatbot finalized.")
        return TransitionCallbackReturn.SUCCESS

    #################################

    def publish_diagnostics(self):

        arr = DiagnosticArray()
        msg = DiagnosticStatus(
            level=DiagnosticStatus.OK,
            name="/intent_extractor_chatbot",
            message="chatbot chatbot is running",
            values=[
                KeyValue(key="Module name", value="chatbot"),
                KeyValue(key="Current lifecycle state",
                         value=self._state_machine.current_state[1]),
                KeyValue(key="# requests since start",
                         value=str(self._nb_requests)),
            ],
        )

        arr.header.stamp = self.get_clock().now().to_msg()
        arr.status = [msg]
        self._diag_pub.publish(arr)

    def run(self) -> None:
        """
        Background task of the chatbot.

        For now, we do not need to do anything here, as the chatbot is
        event-driven, and the `on_user_input` callback is called when a new
        user input is received.
        """
        pass
Next steps

We have completed a simple social robot architecture, with a mission controller that can react to user intents, and a chatbot that can extract intents from user.
You can now:
- Extend the mission controller: add more intents, more complex behaviours, etc;
- Structure your application: split your mission controller into tasks and skills, and orchestrate them;
- Integrate navigation and manipulation, using the corresponding navigation skills and manipulation skills
- Finally, deploy your application on a real robot. For PAL robots, you can use the PAL Robotics’ tools;